Closing in on Your Dream Home: A Comprehensive Final Walkthrough Checklist
Congratulations! You’ve finally found your dream home, and the closing day is fast approaching. But before you celebrate, there’s one important step you shouldn’t overlook the final walkthrough before closing checklist. This crucial process ensures everything is in order and meets your expectations before officially taking ownership of your new abode.
In this article, we’ll provide you with a comprehensive final walkthrough checklist, covering every aspect of your future home, from top to bottom. We’ll guide you through each room, highlighting potential areas of concern, and sharing tips on what to look out for during your inspection.
From checking the functionality of appliances and fixtures to examining the condition of walls, floors, and ceilings, our checklist ensures that no stone is left unturned. Whether it’s your first time going through the home buying process or you’re a seasoned homeowner, our guide will give you the peace of mind you need to confidently close the deal on your dream home.
Get ready to make your final walkthrough a breeze with our comprehensive checklist. Your dream home is within reach – let’s make sure it meets your expectations!
The importance of a final walkthrough before closing checklist
This crucial process ensures everything is in order and meets your expectations before officially owning your new home.
A final walkthrough is your last chance to inspect the property and identify any issues or concerns that must be addressed before closing the deal. It allows you to make sure that the property’s condition hasn’t changed since you last saw it, and that any repairs or agreed-upon improvements have been completed to your satisfaction.

Understanding the purpose of a final walkthrough
The purpose of a final walkthrough is twofold. First, it allows you to verify that the property is in the same condition as when you made your offer. Second, it allows you to ensure that any repairs or updates agreed upon during the negotiation process have been properly executed.
During this stage, you’ll want to confirm that:
- All the requested repairs have been completed.
- No new issues have arisen since the inspection.
- All agreed-upon fixtures, furniture, and appliances are still present and functioning correctly.
- All systems and appliances, as stated by the seller to be in proper working order at the time of the offer, are still functioning correctly.
While this may seem like a lot to accomplish, taking the time to do it right can prevent headaches. It’s not uncommon for things to go wrong during the move-out phase or for repairs to be overlooked. It’s essential to pay attention to details and thoroughly inspect each area to avoid any surprises after closing.
Search Realtor CA MLS Listings in Ontario

When should you Schedule the final walkthrough?
When should a final walk-through take place? In the context of purchasing a house in Ontario, it is recommended that the final walk-through take place 24 to 48 hours before the day of closing the deal. This allows buyers ample time to ensure that the property is in the same condition as when they agreed to buy it. Typically conducted after the seller has moved out, this final inspection serves as a last opportunity for buyers to confirm that everything is in place and to address any identified issues before finalizing the transaction. Buyers can even begin measuring for new window coverings or making renovation plans during the inspection. Overall, the timing of the final walk-through can depend on the specifics of the purchase agreement and the advice of your real estate professional. Remember, the final walkthrough isn’t a mere formality; it’s your last chance to make sure you’re getting what you paid for. Therefore, choosing a time when you’re not rushed and can perform a detailed inspection is crucial.
Preparing for the final walkthrough
Before embarking on your final walkthrough, it’s crucial to be prepared. Review the purchase agreement and any addendums to refresh your memory on the agreed-upon repairs or improvements. During the inspection, bring a copy of these documents to compare them and ensure that everything has been addressed.
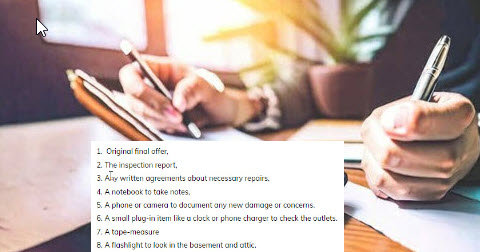
Below is my list of other items that could come in handy.
- Original final offer,
- The inspection report,
- Any written agreements about necessary repairs,
- A notebook to take notes,
- A phone or camera to document any new damage or concerns.
- A small plug-in item like a clock or phone charger to check the outlets.
- A tape-measure
- A flashlight to look in the basement and attic.
Overall, you can ensure a smooth and successful home-buying process by being well-prepared and conducting a thorough final walk-through.
Additionally, it’s helpful to bring a checklist to guide you through the inspection process. This will help you stay organized and ensure you don’t miss any key areas or items to check. Taking photos or videos during the walkthrough can also be useful for documentation.
Who should be present during the final walk-through?
During the final walkthrough, it’s advisable for the buyer to be present, as this is their last opportunity to personally verify the condition of the home before closing. Along with the buyer, a real estate agent, preferably the one who aided in the home-buying process, should be there to provide professional insights and advice. Also, the home inspector who initially inspected the house could attend. Their expertise can be invaluable in checking repairs and assessing any new issues. Lastly, the seller or agent might be present to answer any questions and ensure a smooth and transparent process. However, this is not mandatory, and sometimes, it might be preferable to do the walkthrough in their absence for a more uninhibited inspection.
What if the Current Owner is Still in the House?
Scheduling a walkthrough with the current occupants still in the home can present some challenges for the buyers. Minor issues and small details that may not be immediately noticeable can be easily overlooked. It’s important to remember that people’s belongings and personal items can obscure issues that need addressing.
When the current owner is still occupying the property during your final walkthrough, it’s crucial to maintain professionalism and respect. Before initiating any walkthrough, seek permission from the owner or their agent. While the owner’s presence may limit full inspection, you should focus on visible areas and any agreed-upon repairs. If the owner’s presence prevents a thorough inspection, consider scheduling another walkthrough when the property is vacant. Remember, your primary goal during the final walkthrough is to confirm the property is in the agreed-upon condition before closing.
How Long Does a Final Walkthrough Take?
The duration of a final walkthrough can vary depending on the size and condition of the property, but it typically takes between 30 minutes to an hour. This time frame allows you to thoroughly inspect the property and ensure that everything is in order, from major systems like heating and plumbing to minor details like fixtures and fittings. Particularly, it’s essential to take enough time to verify that all agreed-upon repairs have been completed and no new issues have arisen. Remember, the final walkthrough is not a time to rush; it’s your last opportunity to ensure the property is in the agreed-upon condition before closing.
Exterior inspection checklist
As you begin your final walkthrough, start by inspecting the exterior of the property. When inspecting the house exterior, consider the following steps:
- Begin by examining the backyard to ensure the landscaping is well-maintained and tidy.
- If the property has a gate, walk around and ensure that it securely latches and unlatches.
- For houses with a pool, it’s crucial to inspect it thoroughly. First, make sure it’s working. Look for signs of mildew, mould, or damage to the walls or lining. Additionally, test the pool gates and note any issues discovered.
- Take the time to inspect the home’s irrigation system. Make sure that all the sprinklers are functioning properly and watering the designated areas effectively.
- Don’t forget to inspect any detached structures, such as sheds or guest houses. Verify their condition to ensure they are in good shape and meet your expectations.
- Test the garage door to ensure smooth operation without any malfunctions. Also, check that all remote controls are working correctly.
- Make sure all garbage has been removed from the property.
- Lastly, verify the state of any outdoor repairs that were agreed upon during the closing process. Make a thorough examination and note any discrepancies.
By following this structured approach, you can effectively assess the condition of the house’s exterior, ensuring that everything meets your requirements and expectations.
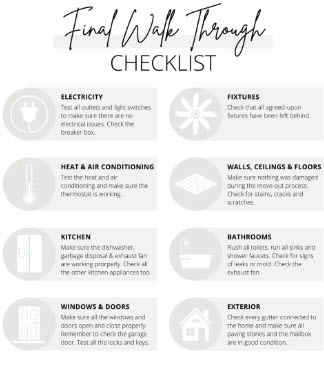 Interior Inspection Checklist
Don’t miss a beat with this must-do checklist:
- Make sure that all lighting fixtures are present.
- Illuminate every light fixture, on and off.
- Check for leaks by running water and inspecting under sinks.
- Look for blatant signs of pest
- Confirm that all sales agreement items, including appliances, are present.
- Put appliances to the test.
- Give garage door openers a once-over.
- Open, close, and evaluate all doors.
- Flush toilets to ensure proper functionality.
- Take a close look at ceilings, walls, and floors.
- Activate the garbage disposal, if any
- Turn on the exhaust fans.
- Confirm the heating and air conditioning are still in working order.
- Check the condition of the flooring, including carpets, tiles, or hardwood, to ensure nothing has changed since the date you agreed to purchase the house.
- Slide all windows open and shut for a thorough check, including window locks and screens.
- Test all light switches and outlets to ensure they’re functioning properly.
- Check items included in the sale, such as kitchen appliances or window treatments, are still present and in good condition.
- Continue your inspection room by room, paying close attention to the kitchen, bathrooms, bedrooms, and living areas. Open and close all doors and windows to ensure they operate smoothly with no signs of damage.
Plumbing and electrical systems checklist
During your final walkthrough, assessing the plumbing and electrical systems is important. Run faucets and showers to check for adequate cold-water pressure, including hot water and drainage. Look for leaks or signs of water damage around sinks, toilets, and showers.
Test all electrical outlets and switches to ensure they’re functioning correctly. Ensure the circuit breaker box is properly labelled and familiarize yourself with its location. Inspect these components if the property has a sump pump or septic system.
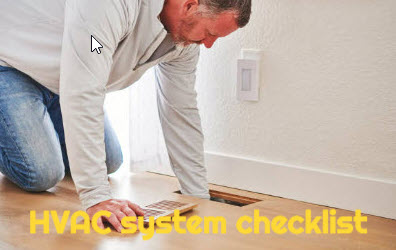
HVAC system checklist
The HVAC (Heating, Ventilation, and Air Conditioning) system is critical to your new home. Check the operation of the heating and cooling systems to ensure they’re working efficiently. Test thermostats in each room to verify their functioning correctly.
Inspect the air filters and determine if they need to be replaced. Ask for the service history of the HVAC system to ensure it has been properly maintained. Have a professional HVAC technician inspect the system to provide you with a detailed assessment.
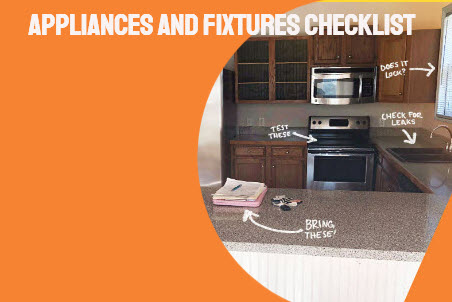
Appliances and fixtures checklist
During your final walkthrough, don’t forget to inspect all appliances and fixtures included with the property. Test the functionality of the stove, oven, dishwasher, refrigerator, and other appliances. Check for any signs of wear or damage and ensure they’re in proper working condition.
Inspect all light fixtures, ceiling fans, and bathroom fixtures. Turn on faucets, showers, and toilets to ensure they function correctly. Don’t forget to test the garage door opener, if applicable, and any other features specific to the property.

Documenting any issues or concerns
Throughout the final walkthrough, document any issues or concerns you come across. Take photos or videos as evidence to support your findings. If you discover any significant problems that were not disclosed or addressed, consult your real estate agent or attorney to determine the best course of action.
Communicating any unresolved issues to the seller or their representative before closing is crucial. Depending on the severity of the problems, you may request repairs, a reduction in the purchase price, or an escrow holdback to cover the cost of necessary repairs.
Finalizing the walkthrough and closing on your dream home
Once you’ve completed the final walkthrough and addressed any outstanding issues, you’re one step closer to closing on your dream home. Review the findings with your real estate agent or attorney to ensure everything has been properly documented and resolved.
During the closing process, review all the documents and contracts before signing. Don’t hesitate to seek clarification or ask for amendments if there are any discrepancies or concerns. Once all the paperwork is in order, it’s time to celebrate – you’re officially a homeowner!
conclusion
In conclusion, a comprehensive final walkthrough is essential to the home-buying process. It allows you to verify the property’s condition, ensure that repairs or improvements have been properly executed, and address any concerns before closing the deal. By following a detailed checklist and documenting your findings, you can confidently move forward and close on your dream home. Your new chapter awaits – enjoy your new abode!
First Time Home Buyer
Are you a first-time home buyer? Learn more about the process of buying your first home in Ontario. Topics include How to Save for a House Down Payment | What to Know Before Buying a Home in Ottawa | Benefits of Getting Preapproved for a Mortgage | Understanding the Ontario First Time Home Buyer Incentive | Misconceptions about Incentives for First-Time Home Buyers in Canada | Best Time to Buy a House | Condo and Townhouse Do you want to Know the Differences | Closing Costs when buying a House in Ontario | Understanding Home Appraisals | Road Map to Home Ownership | final walkthrough before closing checklist | What Do Real Estate Lawyers Do | Condo Status Certificate |Search House for Sale Ottawa and bordering areas and contact us for a no-obligation viewing of any property on our website. View the market report of House Sales Ottawa, enroll in detailed information, and get new listings delivered to your inbox. You can manage and save your searches and properties with the Property Organizer on our resources page Property Organizer. Calculate your Mortgage Payments with our Calculator and learn how much you can afford. You can also read more about us or reach out to us with your questions or arrange a viewing. In our blog section of this site, you will find helpful tips and current information about assorted topics related to real estate. This website is operated and owned by Sandi Branker. Sandi is a professional realtor servicing your area and a proud ZOLO Realty team member.